
Tips For Mountain Bike Maintenance
You can take several steps to ensure that your Mountain Bike is in good condition.
These steps are important for keeping your Mountain Bike in good shape so you can ride safely.
Regular Cleaning
- Rinse off mud and debris after each ride.
- Use a gentle bike cleaner, soft brush, and sponge.
Lubrication
- Lubricate the chain regularly with a bike-specific lubricant.
- Apply lubricant to moving parts like cables and pivot points.
Tire Inspection
- Check tire pressure before each ride and inflate to the recommended PSI.
- Inspect tires for cuts, wear, or embedded objects.
Brake Maintenance
- Check brake pads for wear and replace if necessary.
- Ensure brake levers are firm and responsive.
Suspension Care
- Clean dust seals and stanchions of suspension forks.
- Follow manufacturer guidelines for service intervals.
Drivetrain Check
- Inspect the chain, cassette, and chainrings for wear.
- Clean and lubricate the drivetrain components.
Bolt Tightening
- Use a torque wrench to tighten bolts to specification.
- Check all critical bolts, including stem, handlebar, and seat post.
Wheel Truing
- Spin wheels to check for wobbles or hops.
- Adjust spoke tension as needed or take to a professional.
Gear Adjustment
- Test shifters and derailleurs for smooth gear changes.
- Adjust cable tension or have a professional tune the gears.
Bearing Inspection
- Check for play or roughness in the headset, hubs, bottom bracket, and pedals.
- Service or replace bearings as needed.
Storage
- Store your bike in a dry, clean space.
- Avoid hanging the bike by the wheel or exposing it to extreme temperatures.
Remember, consistent maintenance can prolong the life of your bike and enhance your riding experience.
Always consult your bike’s manual for specific maintenance recommendations.
Checking carbon fiber components
When mountain bike maintenance, checking carbon fiber components for cracks and damage is essential, this material is more vulnerable to damage than other materials, and it is important to ensure the bike is in good condition to avoid accidents.
Although it undergoes extensive testing, carbon fiber is not foolproof. It can break, and in some cases, you will not even notice if it has happened.
Depending on your bicycle model, the manufacturer may offer a specific repair process or recommend a trusted third-party repair shop.
You should be familiar with the appropriate tools to check carbon fiber components.
One of these tools is a torque wrench. Make sure you are using the correct torque when tightening carbon components.
You should also learn how to use the wrench properly.
A torque wrench is essential for assembling carbon bike parts.
Checking Carbon Fiber Components on Your Mountain Bike
Visual Inspection
- Look for any cracks, scratches, or fraying in the carbon fiber.
- Pay special attention to areas under high stress like the seat post, handlebars, and frame junctions.
Cleaning
- Use a soft cloth and mild, bike-specific cleaner to remove dirt and grime.
- Avoid harsh chemicals that could damage the resin in the carbon fiber.
Impact Damage
- Check for signs of impact damage, which may compromise the structural integrity.
- Even small impacts can cause internal damage not visible on the surface.
Torque Settings
- Use a torque wrench when adjusting bolts on carbon components to avoid over-tightening.
- Follow the manufacturer’s recommended torque settings precisely.
Stress Areas
- Inspect the areas where accessories are clamped, such as bottle cages, lights, or computers.
- Look for signs of crushing or distortion on the carbon surface.
Regular Check-Ups
- Schedule regular inspections of your carbon fiber components, especially after crashes or heavy rides.
- If in doubt about the condition of any part, consult with a professional bike mechanic.
UV Protection
- Consider using UV protectant products on exposed carbon parts to prevent damage from sunlight.
Handle With Care
- When transporting or working on the bike, avoid dropping or knocking the carbon components.
- Avoid clamping carbon frames or seat posts in work stands.
Carbon fiber requires careful attention and handling due to its unique properties.
If any damage is found during inspection or if you’re uncertain about the integrity of any component, it’s best to have it evaluated by a professional.

- LIGHT, STRONG & PORTABLE: The repair stand is made of lightweight aluminium alloy with a durable plastic head and clamps. It is compact when folded and designed for convenience and durability.
- HEIGHT ADJUSTABLE: Quick Release Adjustable (from 1m to 1.5m or 39″ to 59″ when fully extended). Strong quick-release skewers are included for adjusting the height, tilt and angle of this work stand, this could be really helpful when you want to get the bike in the optimal working position for you.
- ROTATABLE HEAD: Smart design, the head is 360-degree rotatable by turning the quick-release knob. The teeth and clamp are both well-made and heavy-duty. This bike stand could hold bikes up to 25kg or 55lbs at any angle.
- TOOL PLATE INCLUDED: Foldable magnetic tool plate is included for secure storing of the bolts and nuts. Simply attach or remove the tool plate as you like for quick, easy set-up and storage.
- DURABLE & RELIABLE: This bike work stand has been on the market for over ten years and is known for its reliability and durability for home or shop use. We offer a 5-year warranty on the stand and maintain sufficient parts for any claims in our warehouse.
Last update on 2026-07-21 / Affiliate links / Images from Amazon Product Advertising API
Inspecting the brakes
Inspecting the brakes is an important part of maintenance for your mountain bike.
Ensure that your brake pads are thick enough and are free from dirt or grease.
Inspecting your brakes before riding is especially important if you’re unsure whether they’re working properly.
Inspecting Brakes on Your Mountain Bike
Visual Inspection
- Look for wear and tear on the brake pads.
- Check the rotors for any damage or excessive wear.
Brake Pads
- Measure the thickness of the brake pads.
- Replace the pads if they are thinner than the manufacturer’s recommended level.
Brake Levers
- Squeeze the levers to ensure they feel firm and return to position smoothly.
- Look for any signs of fluid leakage around hydraulic brake levers.
Rotors
- Check for true (no warping or bending).
- Use a rotor truing tool if minor adjustments are needed.
Caliper Alignment
- Make sure the calipers are properly aligned to the rotors.
- Adjust as necessary to prevent rubbing.
Cable and Housing (for mechanical brakes)
- Inspect the cable for fraying or rust.
- Ensure the housing is intact with no sharp bends or kinks.
Hydraulic Brake Fluid (for hydraulic brakes)
- Check fluid levels in the reservoir.
- Look for signs that a bleed might be necessary, like spongy levers or diminished stopping power.
Test Ride
- After inspection and any adjustments, do a test ride in a safe area.
- Confirm that the brakes engage smoothly and evenly without any unusual noises.
Regular brake inspection and maintenance are crucial for safety and optimal performance. If you’re unsure about any aspect of brake maintenance, consult a professional mechanic.
The first step to inspecting brakes is to look at the levers.
Ideally, the levers are loose but not too loose.
Also, the brake caliper should be free to move when the lever is released fully. If it’s not, clean it thoroughly.
Then, try to press the levers to ensure smoothness. If you feel resistance when pressing the lever, you should clean or replace the brake pads.
Moreover, the brakes should be properly adjusted.
This is crucial because properly adjusted brakes can prevent you from losing control of your bike and injuring yourself.
Brake pads are small, rectangular metallic surfaces with rubberized surfaces. They wear down over time, so inspect them every few months. If the material is thinner than 1mm, it’s time to replace them.
You can also check your brake rotors with a rotor truing tool. This tool will gently bend the rotors into proper alignment. Be sure to use extreme care when using this tool.
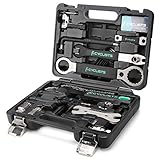
- TOOL KIT PART I: Chain Rivet Extractor; Flat Screwdriver 3mm; Hex Key Wrench; Chain Ring Nut Wrench; Dust Cap Wrench; 8mm Hex Key Wrench & 1/2” Drive Adaptor; Flat/Phillips Screwdriver T25; Pedal Wrench, 15mm Spanner & 14/15 Socket Wrench for Rear/Front Hub Nut.
- TOOL KIT PART II: Lock Ring Remover; Freewheel Turner; Hub Cone Spanner; Bottom Bracket Wrench; Spoke Wrench; Cartridge Bottom Bracket Tool; Crank Puller; Patch Kit; Essential Torque Wrench Kit.
- MADE TO LAST: All the tools are well built and constructed with pro-quality material, forethought, and genuinely exceptional with their attention to detail, which will prevent the tools wear through the years of use. Whether you are heavy bike enthusiasts or professionals, if you are trying to get your bikes fixed, then this tool kit is undoubtedly the best choice for you to have as it will satisfy most of your bike maintenance needs.
- STURDY STORAGE CASE: The tools are well organized and firmly stay put in their niches inside a protective case with a strong metal clasp. The specially designed hard case will secure the tools in place and not cause any mess while carrying.
- ORDER NOW, WORRY-FREE! We’re so confident about the quality of our product that we can provide a one-year warranty! Made in Taiwan.
Last update on 2026-07-21 / Affiliate links / Images from Amazon Product Advertising API
Inspecting gears
Inspecting the Gears on Your Mountain Bike
Visual Inspection
- Check for bent or missing teeth on the chainrings and cassette.
- Look for any signs of wear like shark-fin-shaped teeth.
Chain Wear
- Use a chain checker tool to measure chain stretch.
- Replace the chain if it’s beyond the manufacturer’s recommendation for wear.
Shifting Performance
- Shift through all gears to ensure smooth transitioning.
- Listen for grinding or skipping, which may indicate an issue.
Derailleur Hanger
- Ensure the derailleur hanger is straight and not bent.
- A bent hanger can affect shifting accuracy and should be realigned or replaced.
Cable Condition
- Examine shift cables for fraying or rust.
- Check cable housing for cracks or stiffness.
Cleanliness
- Clean the cassette, chainrings, and derailleurs with a degreaser and a soft brush.
- Dirt and grime can affect shifting performance and cause premature wear.
Lubrication
- After cleaning, lubricate the chain, paying attention to each link.
- Wipe off any excess lubricant to avoid attracting more dirt.
Derailleur Adjustment
- Check the front and rear derailleurs for proper alignment.
- Adjust limit screws and cable tension if the gears are not shifting correctly.
Test Ride
- After inspection and any adjustments, do a test ride to confirm that gears are shifting smoothly.
- Make fine adjustments if needed to optimize gear performance.
Regular gear inspections help maintain optimal performance and reduce the risk of damage during rides.
If you experience persistent issues with gear shifting after your own maintenance, it may be time to consult a professional mechanic.
Aside from checking the chainrings, it is also a good idea to check the derailleur and brake assemblies. These components contain a lot of small moving parts.
You should inspect the brakes and derailleurs for looseness and binds. You should also apply lubricant to the pivot points.
Checking skewers
Checking skewers is a key step in maintaining your mountain bike.
They are responsible for ensuring the wheels stay on your bike and should be checked every time you ride.
If the skewers are bent or loose, this will prevent you from replacing a wheel.
Skewers should be installed on the front and rear of your bike, with the lever placed on the non-drive side.
The lever should be positioned just behind the forks, as a more forward placement makes releasing the forks harder.
The rear skewer should be placed aft of the seat stay if your frame design allows it.
- 【Complete Bike Tool Kit】: The CYCLISTS 23 piece Bike Tool Kit contains all the tools to help you keep your bike in perfect working order, perform routine maintenance, repairs and upgrades.
- 【Easy to Use】: The Bike Repair Tool Box is a tool set for bike mechanics at home, work or on the road. If you are looking to maintain your own bike or wanting a mobile tool case to take on the road, the CYCLISTS bike tool kit will become a firm favorite for accomplishing your maintenance.
- 【Bicycle Repair Tool Kit Includes】: Chain rivet extractor, Chain ring nut wrench, Crank puller, Freewheel turner&lock ring wrench, Bottom brachet wrench, 15mm pedal wrench, Hex hey wrench(8mm), 2-in-1 master link chain pliers, Tire lever, Flat/phillip screwdriver, Flathead screwdriver, Hex key wrench set, Torx wrench, Hub spanner, Spoke wrench, Crank cap wrench, Lockring removal tool, Cartridge BB tool, Tire patch kit.
- 【High Quality Material】: Major in bike accessories more than 10 years, we know a lot about cycling products, this bike tool set made in Taiwan – world excellence of cycling products. This tool set with premium carbon steel and high quality plastic tool construction ensures durability and strength.
- We truly want you to be happy with your new bicycle repair tool kit and our professional customer service will do whatever it takes to ensure your satisfaction we are offering a 12-month guarantee.
Last update on 2026-07-27 / Affiliate links / Images from Amazon Product Advertising API
Checking Thru-Axles on Your Mountain Bike
Visual Inspection
- Look for any visible signs of damage or bending.
- Ensure there are no cracks or severe scratches on the axle.
Tightness
- Confirm that the thru-axles are secured at the correct torque specification.
- Use a torque wrench if necessary to achieve proper tightness.
Threading
- Inspect the threads for dirt, damage, or wear.
- Clean the threads and apply a light lubricant if they appear dry or dirty.
Lever Operation
- Check that the lever operates smoothly and closes firmly.
- When closed, the lever should be securely positioned and not interfere with any bike components.
Hub Interface
- Ensure that the axle is sitting flush and properly within the hub.
- When secured, there should be no play or movement between the hub and axle.
Regular Maintenance
- Remove the thru-axles periodically to clean and inspect them.
- Look for any corrosion, especially in areas with harsh weather conditions or after riding through water.
Alignment
- Make sure the wheel is properly aligned in the dropouts before securing the thru-axle.
- Misalignment can lead to uneven wear and affect braking and handling.
A well-maintained thru-axle system is critical for the safety and performance of your mountain bike.
If you encounter any issues with your thru-axles that you can’t resolve, it’s wise to have them inspected by a professional bike mechanic.
After installing new components, make sure to check the tightness of the bolts.
If they are not tight, this can affect your bike’s shifting and cause other problems. In addition, check the condition of your brakes and gears to ensure that they are in proper working order.
A mountain bike’s suspension can wear out due to several factors. Common worn-out parts include the chain, bottom bracket bearings, and suspension linkage.
If these components aren’t performing properly, check them with a torque wrench and adjust them to the proper torque.
By checking these components, you will have a smoother ride and lower maintenance costs in the long run.
In addition to disc brakes, thru-axles increase your mountain bike’s rigidity. They also increase safety.
A through-axles are usually compatible with quick-release skewers for added safety and ease of maintenance. They also allow you to replace wheels without disassembling your bike.
Checking Bearings on Your Mountain Bike
Wheel Bearings
- Lift the bike and spin the wheels, listening for grinding or roughness.
- Check for side-to-side play in the wheel by gently rocking it perpendicular to the rotation.
Headset Bearings
- Hold the front brake and rock the bike back and forth to feel for play in the headset.
- Listen for any clicking or grinding noises when turning the handlebars.
Bottom Bracket Bearings
- Remove the chain from the chainring and spin the cranks.
- Feel for any grinding or resistance and check for side-to-side movement in the cranks.
Pedal Bearings
- Spin each pedal to assess smooth rotation.
- Check for lateral play in the pedal axle.
Pivot Bearings (Full Suspension)
- Inspect any pivot points on full suspension frames for smooth movement.
- Check for play or unusual movement by manipulating the rear triangle.
Hub Bearings
- Check for smooth rotation and side play for hubs, similar to wheel bearings.
Regular Maintenance
- Service bearings according to your riding conditions and manufacturer’s recommendations.
- Consider replacing sealed cartridge bearings if they show signs of wear or damage.
Professional Assessment
- If you’re not comfortable checking or servicing bearings, or if you find issues, a visit to a professional bike mechanic is recommended.
Bearings are crucial for smooth operation of moving parts on your bike. Keeping them in good condition can prevent more significant issues down the line.
Checking the Chain on Your Mountain Bike
A worn-out chain will affect your riding performance. It also leads to premature wear of the cassette and chainrings.
Visual Inspection
- Look for rust, dirt build-up, and any obvious damage to the chain links.
Chain Wear
- Use a chain checker tool to measure chain stretch.
- Replace the chain if it has reached the wear limit according to the tool’s indication.
Chain Length
- Ensure the chain is the correct length for your drivetrain.
- A chain that’s too long or too short can cause shifting issues.
Lubrication
- The chain should be lubricated with a suitable bike chain lubricant.
- Excess lubricant should be wiped off to prevent attracting dirt.
Cleaning
- Clean the chain regularly using a chain cleaning device or by gently brushing with a degreaser.
- Rinse with water if using a water-soluble degreaser and dry before lubricating.
Flex Test
- Check for stiff links by bending the chain laterally.
- Stiff links can cause skipping and should be worked back into flexibility or replaced.
Sprocket Engagement
- Inspect how the chain sits on the sprockets.
- A worn chain may not sit properly and could lead to skipping under load.
Chainring Contact
- Look at the front chainrings while pedaling backward to see if the chain maintains good contact.
- Watch for the chain lifting off the chainrings, indicating wear on either component.
Regular chain inspection helps to ensure efficient power transfer and smooth shifting and prolongs the life of other drivetrain components.
If you’re unsure about your chain’s condition or how to address issues, seek assistance from a bike shop.
Final Thoughts
Maintaining your mountain bike is essential for optimal performance, safety, and longevity of the bike.
Regular inspections of all components, including the chain, gears, brakes, bearings, and carbon fiber elements, can help identify potential issues before they become serious problems.
Consistent cleaning, proper lubrication, and timely replacement of worn parts will keep your bike in top condition and enhance your riding experience.
Always adhere to the manufacturer’s guidelines for maintenance and when in doubt, or if you encounter complex issues, consult with a professional bike mechanic.
Remember that investing time in regular maintenance saves you money on repairs and ensures your bike is ready for any adventure.


